Your position: Home
/
WiFi Magic Box Scope Driver Download
WiFi Magic Box Scope Driver Download
Please note the WiFi magic box is for iPhone/iPad/Android phone and tablet only. For Windows, Mac, Linux and other PCs, you can connect the usb of microscope to the computer and open the exact app to make it work. If you have any problems, please feel free to contact us by email. We will reply in 12 hours. Our email address is jiusion@outlook.com.
Quick Access
iPhone/Android
Windows
Mac
Chrome OS
Linux
Update driver in Windows
iPhone/Android
Step 1. Install "Scope View" app
Search “Scope View” on App store/Google Play. You can also click the link as below or scan codes to get the downloading page.
iOS app store: Scope View.ipa(9.70MB) iOS 8.0 and above
Android Google Play: Scope View.apk(20.9MB) Android 4.1 and above
Android user can also click 3rd link to download the app directly if you didn't have Google Play account:
 Scope View.apk(14MB) Android 4.1 and above

If you can’t find the app “Scope View” or app occurs errors, you can install the backup apps like
iOS: DT WiFi, WiFi Look
Android: DT WiFi , WiFi Look
Step 2 Plug the microscope to WiFi box
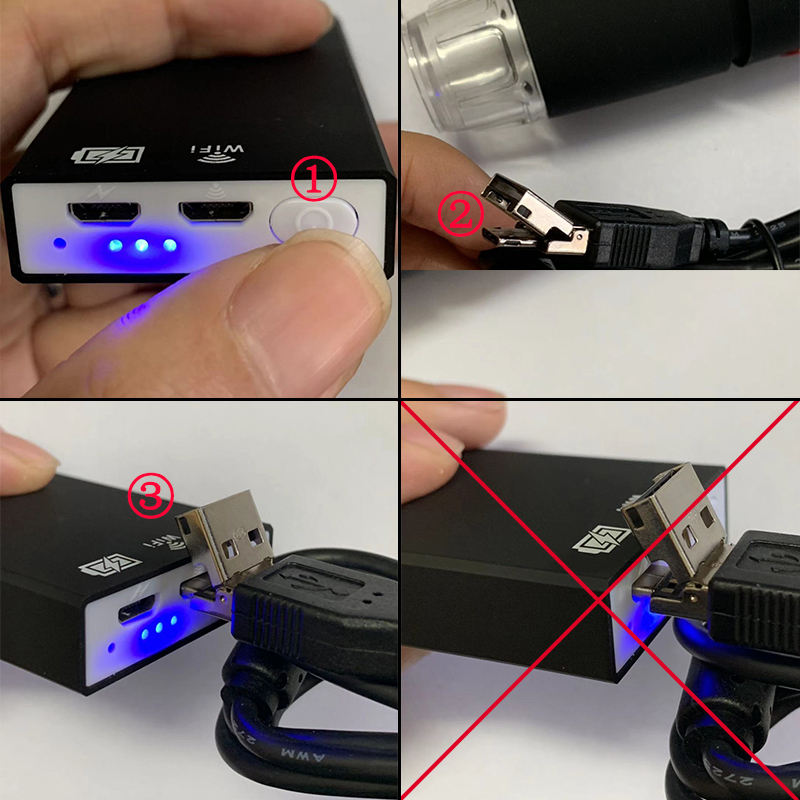
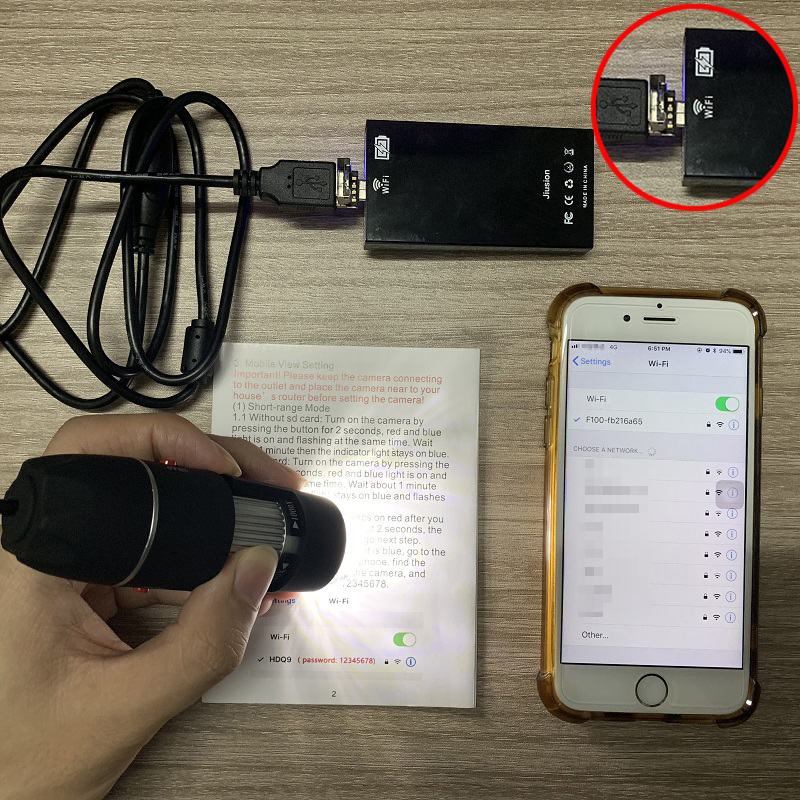
①Long press the Power button of WiFi box to turn on it. The battery yellow led lights up first. After 5s, the WiFi Signal blue led lights up. ②Flip a piece from USB plug of microscope to change to micro usb plug. ③Connect the microscope’s micro USB port to the Box’s WiFi port which has the WiFi icon(Don't connect to the Charging port with battery icon). The microscope led will light up. (If not, check the cable led switch of the microscope).
Step 3 Connect the built-in WiFi "F100"
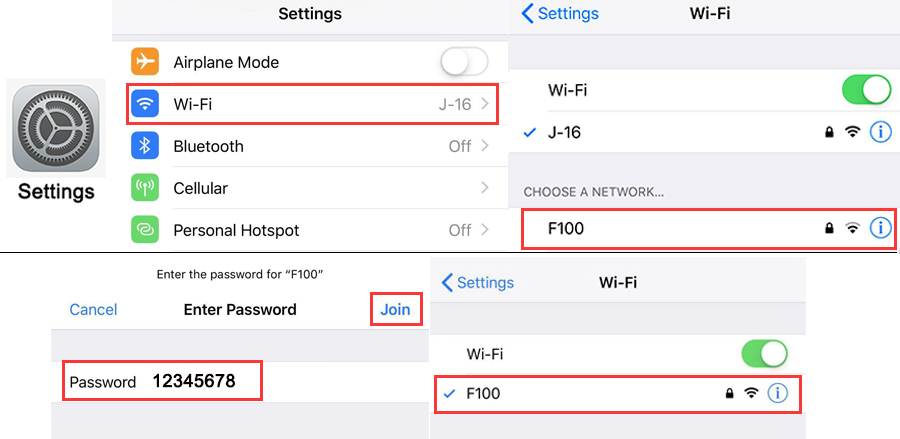
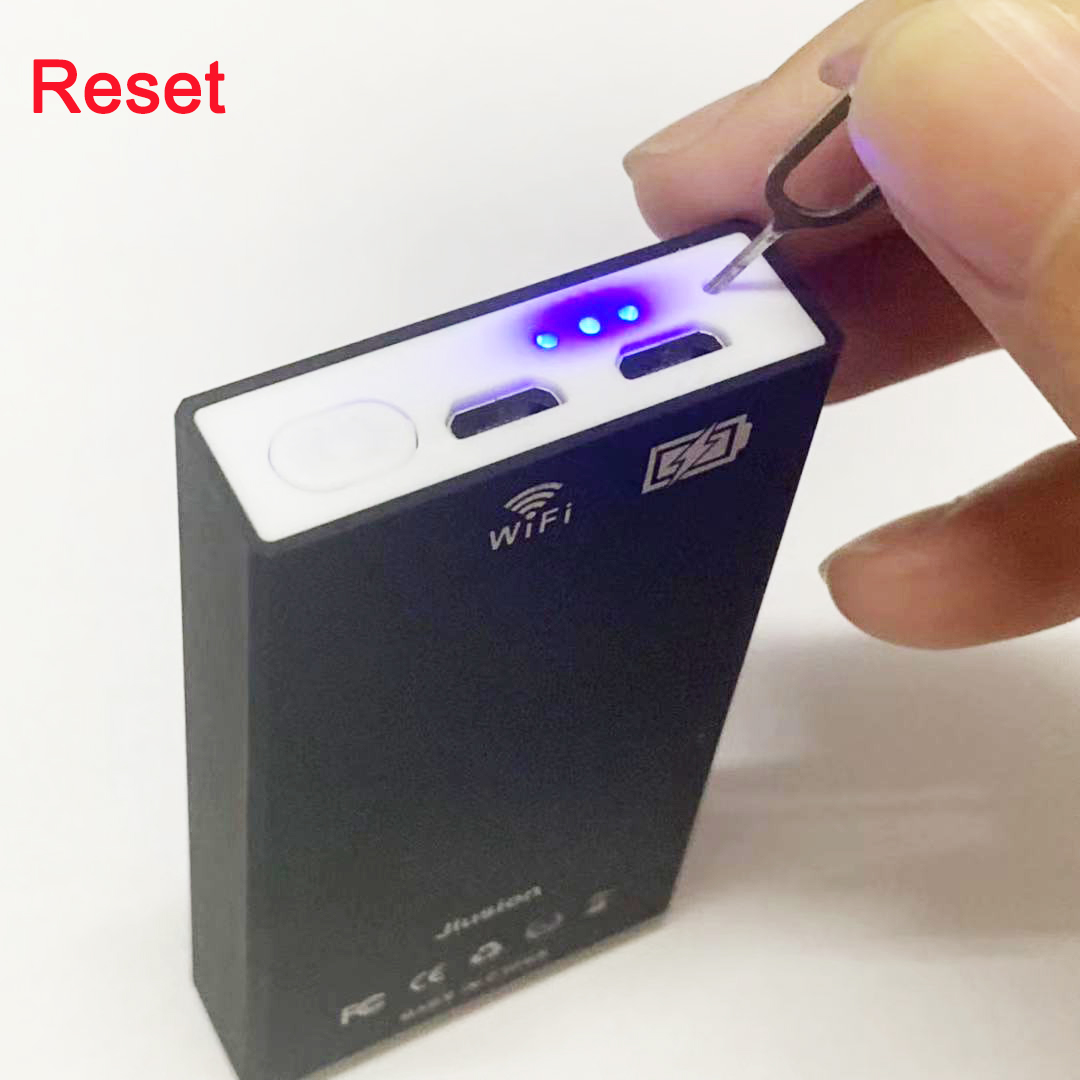
Open "Settings" - "WLAN/WiFi" and connect the WiFi with the name ”F100-xxx”. The password is 12345678 or empty( or 88888888 ). If it reports passwords error, you can reset the WiFi magic box (long press the reset button for 10 seconds when WiFi magic box is activated).
Step 4 Open the Scope View app
Open the app "HD WiFi" and rotate the LED Control to adjust the light and Focus Wheel to focus. If you can only get a black screen on Scope View app, please confirm if you have allowed the app Scope View to access Local Network. Or install the backup app "DT WiFi" , "WiFi Look" . Please note the snap and zoom button won’t work on the iPhone/Android. If you still get black after setup, please click jiusion@outlook.com to send an email to us.
IOS: Settings - Scope View - Allow Scope View to access Local Network.
Android: Settings - Installed apps - Scope View - Restrict data usage - WLAN/WiFi. Allow and tap OK.

Windows
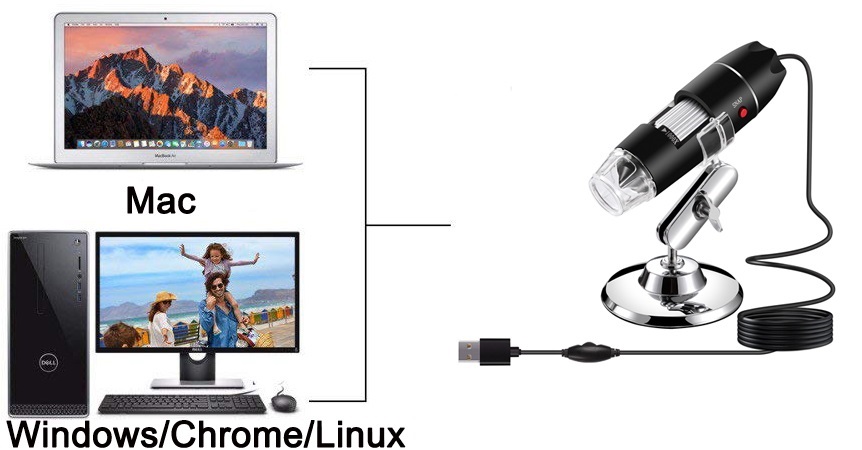
You don't need to use WiFi Magic Box if you want to use the microscope on Windows/Mac/ Chrome/Linux.
Since Jiusion microscopes use a standard webcam chipset, they will automatically install default webcam (UVC) drivers when plugged into a host device. They can be used with any webcam apps. User can select one or more to install.
Windows 10/11 users please ensure that the "Camera" in the privacy settings is turned on.
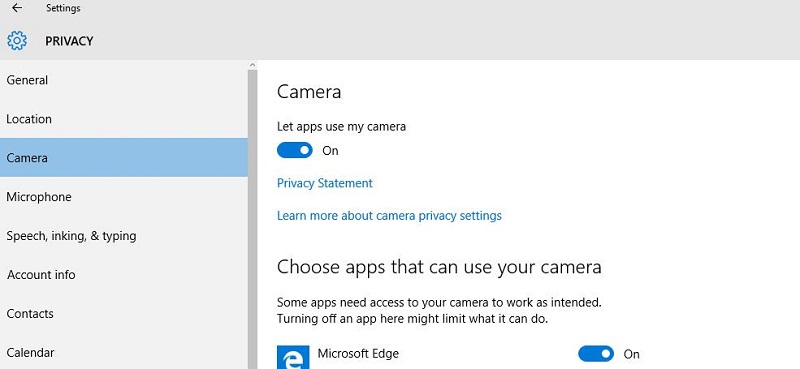
1) Win10/11 built-in camera app
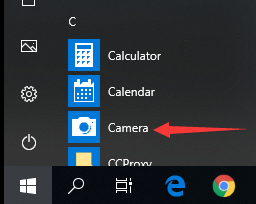
If you are Win10/11 user, you can plug the microscope to the Win10/11 computer and open this app to use the microscope directly. You can click "Windows" logo on the left and find the "Camera" app. The downside is that you can't use the snap and zoom buttons in this app.
2) xploview
Click the link as below to download the xploview installation package. Double click the xploview.exe to install the app and open it. Connect the microscope to the computer. Click “Settings” – “Device” to select “USB2.0 UVC PC Camera” on the dropdown. Note the zoom button doesn’t work on this software.
 xploview.exe(3.87MB) Windows XP, Vista, 7, 8, 10, 11 | 32 or 64 bit

3) Amcap
3.1 Download the Amcap
Amcap is a custom Windows (XP and above) software package designed specifically to work with the microscope.
 Amcap.zip(3.44MB) Windows XP, Vista, 7, 8 | 32 or 64 bit
 Amcap.exe(9.46MB) Windows 10, 11 | 32 or 64 bit
Please tap this link to send an email to us if you can't download it jiusion@outlook.com
3.2 Extract the Amcap.zip
Step 1: Right Click the Amcap.zip and select "Extract All". Step 2: Click "Browser" to select a location to save the Amcap and click "Extract". Step 3: Double click the extracted folder "Amcap" to open it.

3.3 Install the Amcap
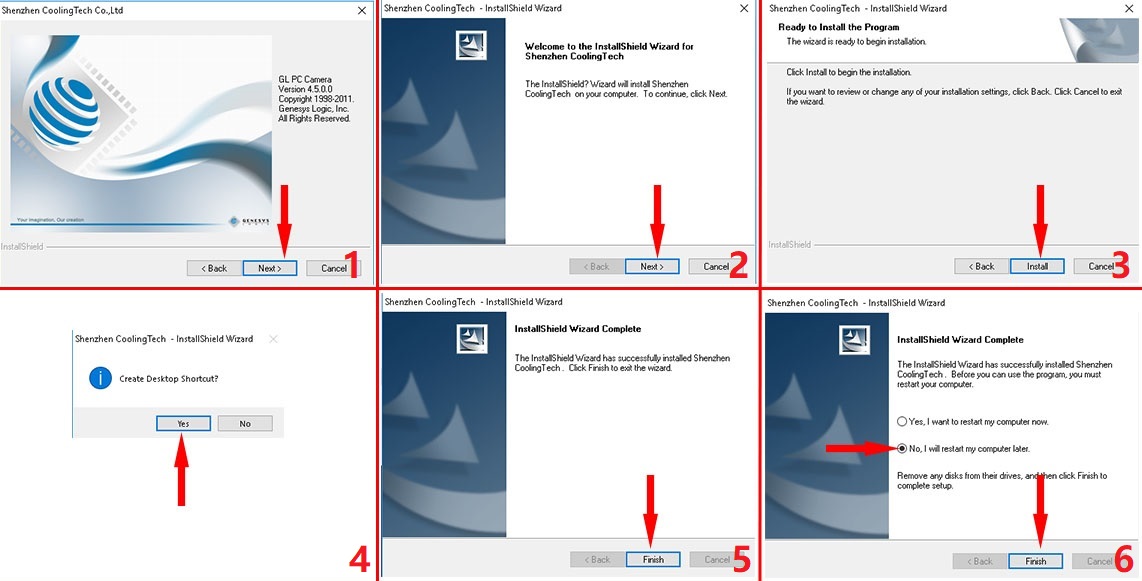
Double click the “setup.exe” to install the Amcap. Select Next - Next - Install - Yes - Finish - No, I will restart my computer later and Finish.

3.3 Plug the microscope and open the Amcap
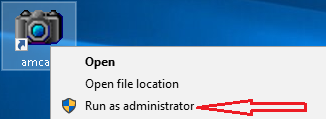
Connect the microscope to the computer. Right click the Amcap and select "Run as administrator" to open the Amcap software. Click "Devices" to select the "GL USB2.0 UVC Camera Device". If you can't find the "GL USB2.0 UVC Camera Device", please tap Update driver to set up.

3.4 Setup the location to save pictures and videos
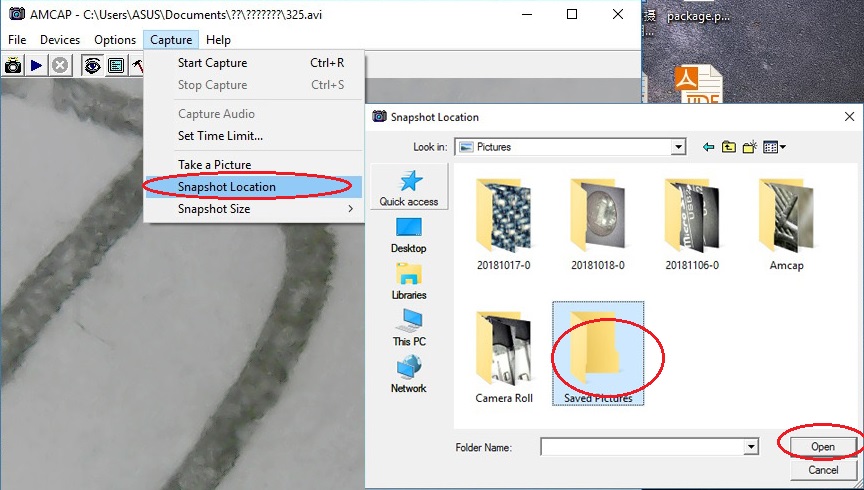
Pictures: Select “Capture” – Snapshot Location – Find or new a folder and click “Open”. You can double click the Snap button to take a snapshoot.
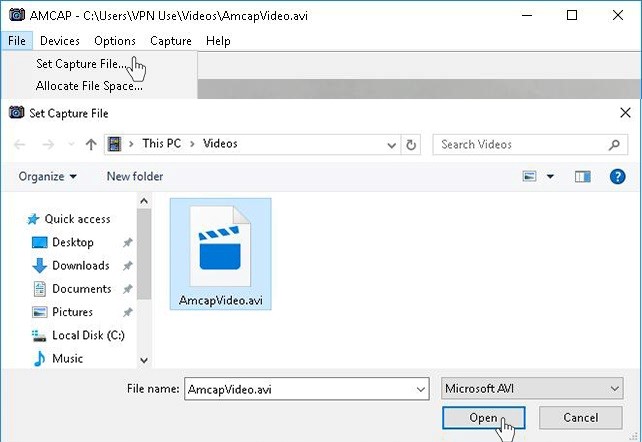
Videos: Click “File” – “Set Capture File”. Find and select an avi format video file. Click “Open”.
4) CoolingTech
Coolingtech measurement software is compatible with Windows 7 8 10.
4.1 Download the CoolingTech
What we provided in this link is a installation-free green version. You can delete directly if you want to uninstall it. Click link as below to download the Coolingtech.zip.
 Coolingtech.zip(2.55MB) Windows XP, Vista, 7, 8, 10, 11 | 32 or 64 bit
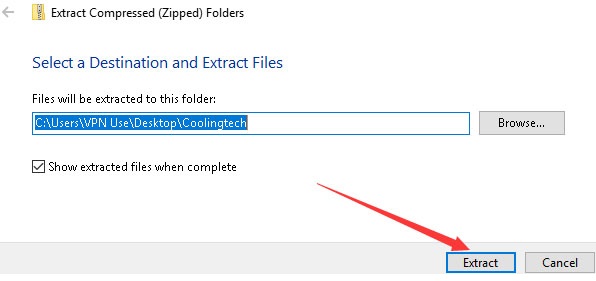
4.2 Extract the Coolingtech.zip
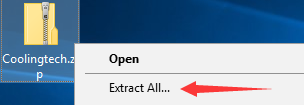
Once the download is finished, right click the "Coolingtech.zip" to select "Extract All..." to extract files out.
4.3 Open the CoolingTech software
Please ritght click the CoolingTech.exe to select "Run as administrator" to open the CoolingTech.exe. As it is a installation-free version, you can open the Coolingtech folder and run the “CoolingTech.exe” as admin to use the Coolingtech measurement software. Close other webcam software like camera app, xploview and Amcap if you can't see anything in this software. Please note the snap and zoom buttons didn’t work in this software. If the software occur errors or want to get a diffence measurement software, please contact us via our customer service email jiusion@outlook.com.

Mac
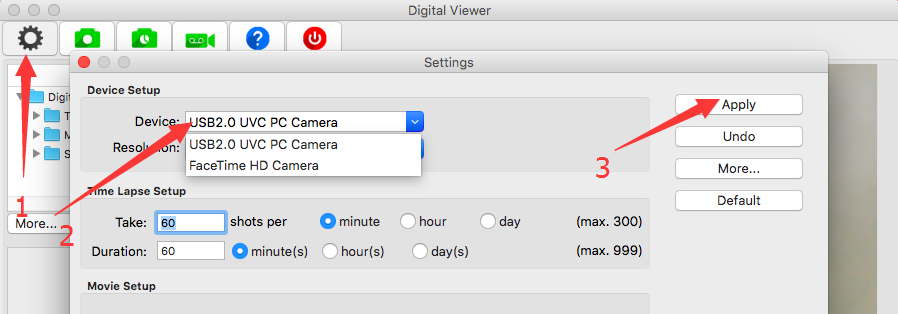
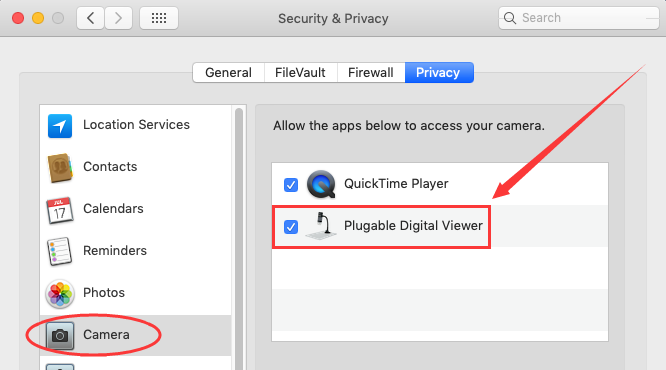
Digital Viewer App is compatible with general purpose Mac microscope software from Plugable Technologies company. Install the app as below and open it. Plug the microscope to the Mac. Open the app ("Finder" - "Application" - "Digital Viewer") and click “Settings” – “Device” to select “USB2.0 UVC PC Camera” on the dropdown to make the microscope work. MacOS10.14 and above users and need to allow the "Digital Viewer" app to access camera in "System Preferences" - "Security & Privacy". Note the zoom button doesn’t work on this software. Please tap this email to contact us if you can't use the microscope on Mac jiusion@outlook.com
 Digital_Viewer_3.3.30.pkg(8.66MB) macOS (10.5 and later) | 32 or 64 bit
Chrome OS
We don’t have drivers for Chrome OS as Jiusion microscopes can be used with the default Camera app that comes with Chrome. Go to Settings > Advanced Settings > Privacy > Content Settings > Camera, and change the device in the dropdown to “USB Microscope”. Access your camera and your magnified object should appear on the screen.

Linux
Ubuntu: Search for the application cheese and click install. Once the installation is completed, open the application cheese. If the program displays your other camera, click on the word cheese in the top bar to access you preferences. In the webcam tab click on the dropdown menu and select USB Microscope.

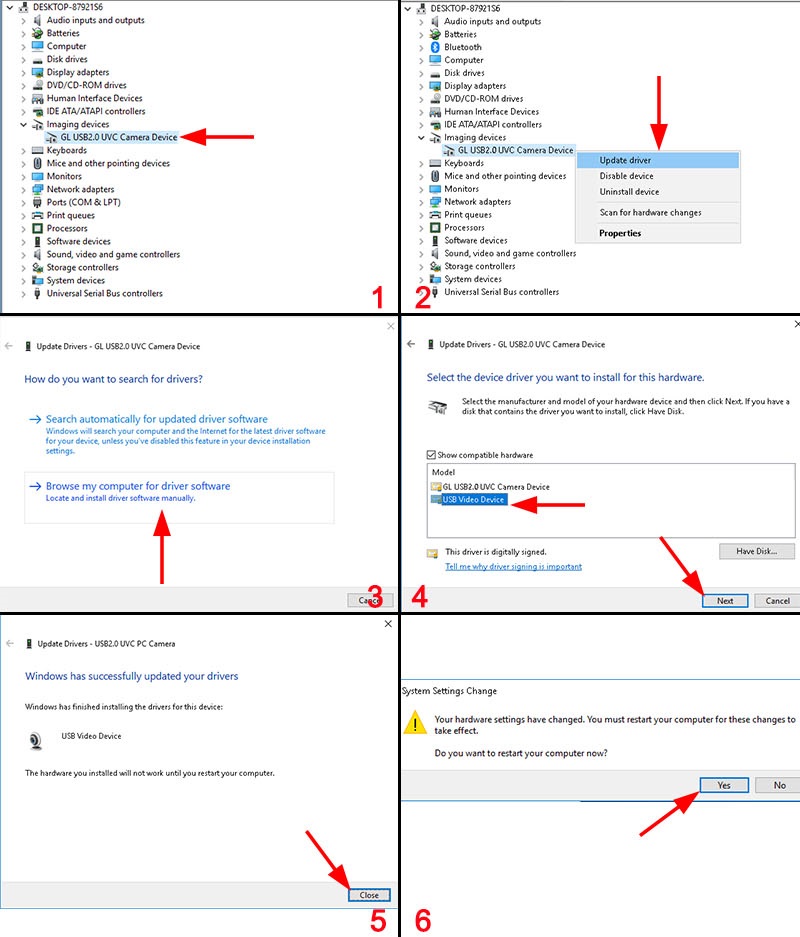
Update driver in Windows
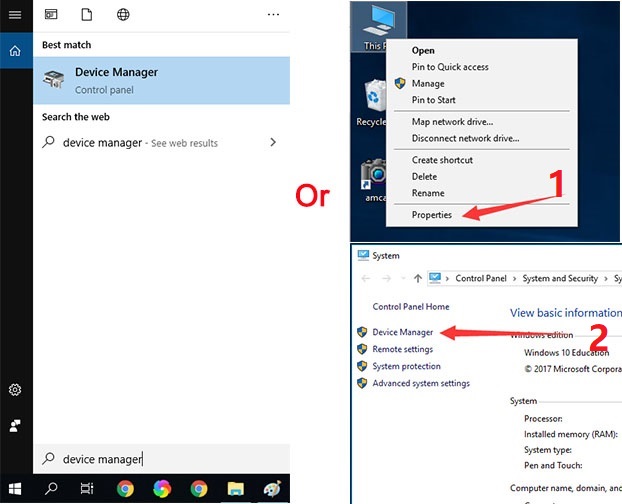
Open the "Device Manager" (Directly search "Device Manager" on Cortana. Or right click "This PC" and select "Properties"- "Device Manager".)
Click "Imaging Device" to show the dropdown. Right click "GL USB2.0 UVC Camera" and select " Update driver" - "Browser my computer for driver software" - "USB Video Device" - "Next" - "Close". Click "Yes" to restart the computer. Once the computer is restarted, open the Amcap and select the microscope under the "Device" to use the microscope.
Quick Access
iPhone/Android
Windows
Mac
Chrome OS
Linux
Update driver in Windows
iPhone/Android
Step 1. Install "Scope View" app
Search “Scope View” on App store/Google Play. You can also click the link as below or scan codes to get the downloading page.
iOS app store:
 Scope View.ipa(9.70MB) iOS 8.0 and above
Android Google Play:
 Scope View.apk(20.9MB) Android 4.1 and above
Android user can also click 3rd link to download the app directly if you didn't have Google Play account:
 Scope View.apk(14MB) Android 4.1 and above
If you can’t find the app “Scope View” or app occurs errors, you can install the backup apps like
iOS: DT WiFi, WiFi Look
Android: DT WiFi , WiFi Look
Step 2 Plug the microscope to WiFi box

①Long press the Power button of WiFi box to turn on it. The battery yellow led lights up first. After 5s, the WiFi Signal blue led lights up. ②Flip a piece from USB plug of microscope to change to micro usb plug. ③Connect the microscope’s micro USB port to the Box’s WiFi port which has the WiFi icon(Don't connect to the Charging port with battery icon). The microscope led will light up. (If not, check the cable led switch of the microscope).

Step 3 Connect the built-in WiFi "F100"
Open "Settings" - "WLAN/WiFi" and connect the WiFi with the name ”F100-xxx”. The password is 12345678 or empty( or 88888888 ). If it reports passwords error, you can reset the WiFi magic box (long press the reset button for 10 seconds when WiFi magic box is activated).


Step 4 Open the Scope View app
Open the app "HD WiFi" and rotate the LED Control to adjust the light and Focus Wheel to focus. If you can only get a black screen on Scope View app, please confirm if you have allowed the app Scope View to access Local Network. Or install the backup app "DT WiFi" , "WiFi Look" . Please note the snap and zoom button won’t work on the iPhone/Android. If you still get black after setup, please click jiusion@outlook.com to send an email to us.
IOS: Settings - Scope View - Allow Scope View to access Local Network.
Android: Settings - Installed apps - Scope View - Restrict data usage - WLAN/WiFi. Allow and tap OK.

Windows

You don't need to use WiFi Magic Box if you want to use the microscope on Windows/Mac/ Chrome/Linux.
Since Jiusion microscopes use a standard webcam chipset, they will automatically install default webcam (UVC) drivers when plugged into a host device. They can be used with any webcam apps. User can select one or more to install.
| Win10/11 built-in camera app | xploview | Amcap | Coolingtech | |
| Easy to install | √ | √ | × | × |
| User Friendly | √ | √ | × | × |
| Snap button works | × | √ | √ | × |
| Zoom button works | × | × | √ | × |
| Measure function | × | × | × | √ |
| Support | Win10/11 Only | Win7/8/10/11 | Win7/8/10/11 | Win7/8/10/11 |

1) Win10/11 built-in camera app
If you are Win10/11 user, you can plug the microscope to the Win10/11 computer and open this app to use the microscope directly. You can click "Windows" logo on the left and find the "Camera" app. The downside is that you can't use the snap and zoom buttons in this app.

2) xploview
Click the link as below to download the xploview installation package. Double click the xploview.exe to install the app and open it. Connect the microscope to the computer. Click “Settings” – “Device” to select “USB2.0 UVC PC Camera” on the dropdown. Note the zoom button doesn’t work on this software.
 xploview.exe(3.87MB) Windows XP, Vista, 7, 8, 10, 11 | 32 or 64 bit
3) Amcap
3.1 Download the Amcap
Amcap is a custom Windows (XP and above) software package designed specifically to work with the microscope.
 Amcap.zip(3.44MB) Windows XP, Vista, 7, 8 | 32 or 64 bit
 Amcap.exe(9.46MB) Windows 10, 11 | 32 or 64 bit
Please tap this link to send an email to us if you can't download it jiusion@outlook.com
3.2 Extract the Amcap.zip
Step 1: Right Click the Amcap.zip and select "Extract All". Step 2: Click "Browser" to select a location to save the Amcap and click "Extract". Step 3: Double click the extracted folder "Amcap" to open it.

3.3 Install the Amcap
Double click the “setup.exe” to install the Amcap. Select Next - Next - Install - Yes - Finish - No, I will restart my computer later and Finish.


3.3 Plug the microscope and open the Amcap
Connect the microscope to the computer. Right click the Amcap and select "Run as administrator" to open the Amcap software. Click "Devices" to select the "GL USB2.0 UVC Camera Device". If you can't find the "GL USB2.0 UVC Camera Device", please tap Update driver to set up.


3.4 Setup the location to save pictures and videos
Pictures: Select “Capture” – Snapshot Location – Find or new a folder and click “Open”. You can double click the Snap button to take a snapshoot.

Videos: Click “File” – “Set Capture File”. Find and select an avi format video file. Click “Open”.

4) CoolingTech
Coolingtech measurement software is compatible with Windows 7 8 10.
4.1 Download the CoolingTech
What we provided in this link is a installation-free green version. You can delete directly if you want to uninstall it. Click link as below to download the Coolingtech.zip.
 Coolingtech.zip(2.55MB) Windows XP, Vista, 7, 8, 10, 11 | 32 or 64 bit
4.2 Extract the Coolingtech.zip
Once the download is finished, right click the "Coolingtech.zip" to select "Extract All..." to extract files out.


4.3 Open the CoolingTech software
Please ritght click the CoolingTech.exe to select "Run as administrator" to open the CoolingTech.exe. As it is a installation-free version, you can open the Coolingtech folder and run the “CoolingTech.exe” as admin to use the Coolingtech measurement software. Close other webcam software like camera app, xploview and Amcap if you can't see anything in this software. Please note the snap and zoom buttons didn’t work in this software. If the software occur errors or want to get a diffence measurement software, please contact us via our customer service email jiusion@outlook.com.

Mac
Digital Viewer App is compatible with general purpose Mac microscope software from Plugable Technologies company. Install the app as below and open it. Plug the microscope to the Mac. Open the app ("Finder" - "Application" - "Digital Viewer") and click “Settings” – “Device” to select “USB2.0 UVC PC Camera” on the dropdown to make the microscope work. MacOS10.14 and above users and need to allow the "Digital Viewer" app to access camera in "System Preferences" - "Security & Privacy". Note the zoom button doesn’t work on this software. Please tap this email to contact us if you can't use the microscope on Mac jiusion@outlook.com
 Digital_Viewer_3.3.30.pkg(8.66MB) macOS (10.5 and later) | 32 or 64 bit

Chrome OS
We don’t have drivers for Chrome OS as Jiusion microscopes can be used with the default Camera app that comes with Chrome. Go to Settings > Advanced Settings > Privacy > Content Settings > Camera, and change the device in the dropdown to “USB Microscope”. Access your camera and your magnified object should appear on the screen.

Linux
Ubuntu: Search for the application cheese and click install. Once the installation is completed, open the application cheese. If the program displays your other camera, click on the word cheese in the top bar to access you preferences. In the webcam tab click on the dropdown menu and select USB Microscope.

Update driver in Windows
Open the "Device Manager" (Directly search "Device Manager" on Cortana. Or right click "This PC" and select "Properties"- "Device Manager".)

Click "Imaging Device" to show the dropdown. Right click "GL USB2.0 UVC Camera" and select " Update driver" - "Browser my computer for driver software" - "USB Video Device" - "Next" - "Close". Click "Yes" to restart the computer. Once the computer is restarted, open the Amcap and select the microscope under the "Device" to use the microscope.

 USD
USD EUR
EUR GBP
GBP CAD
CAD AUD
AUD CHF
CHF JPY
JPY NOK
NOK DKK
DKK SEK
SEK SGD
SGD NZD
NZD

